* Entry for TOOLS.md

* Correct links

* Spell check and cleanup

* [TESTING Docs]: Added intro and a few suggestions. (#2778)

* Add intro and a few suggestions.

* Update docs/TESTS.md

Co-authored-by: Job van der Wal <48634934+J08K@users.noreply.github.com>

Co-authored-by: Job van der Wal <48634934+J08K@users.noreply.github.com>

Co-authored-by: BethanyG <BethanyG@users.noreply.github.com>
12 KiB
Tools
A list of tools, IDEs and editors that can help you write and debug your Python code.
Disclaimer: This is a collection of tools that are popular in our community. We do not have any financial affiliation with any of the tools listed below. We think these tools do their job and there are most certainly other tools that can do those jobs as well.
Before you can start coding, make sure that you have the proper version of Python installed. Exercism currently supports Python 3.8 and above. For more information, please refer to Installing Python locally.
Environments
Python environments are like separate Python installations: they can organize your workflow and projects by keeping the packages you install inside that project. This helps avoid bugs generated by something that you imported in another project.
There are two major virtual environments in use today, virtualenv and conda. Both of are easy to install.
Venv
Also known as virtualenv, venv is a light-weight solution to virtual environments. It creates a separate Python binary for every virtual environment and stores that inside your directory.
Creating your virtual environment
To create a virtual environment, cd to the directory you want to store your environments in. Next, run the venv command with the name of a folder where you want to store this particular environment. Common convention is to call that folder <project-name-here>_venv:
$ python3 -m venv {name_of_virtualenv}
created virtual environment ... in 8568ms
Activating your virtual environment
To activate the virtual environment on Windows, run the following command:
PS> .\{name_of_virtual_env}\Scripts\activate
(venv) PS> _
To activate your virtual environment on Linux, or MacOS X, run the following command:
$ source {name_of_virtual_env}/bin/activate
(venv) $ _
From this terminal you can now run pip commands. All of the packages installed in the environment will be installed inside {name_of_virtual_env}/Lib.
Virtual Environment wrapper
Reference: Wiki
The virtualenvwrapper module manages all your virtual environments in one place. You can create, copy, delete and switch between environments using the tools the module provides. It also allows you to add additional tools using extensions. You can create your own extension using the tutorial found here.
Conda
Latest download can be found here
Packaged with Anaconda, conda environments are similar to venv environments with the key difference being that conda can support the R programming language. Anaconda is most commonly used by researchers and data scientists because it contains a set of tools and programs tailored to them. The Spyder IDE is one of the tools that comes with Anaconda.
To create a new conda environment, go to the Anaconda Navigator. Click on environments and then press the Create button. Fill in a name for your conda environment, select Python 3.8 or above and click Create:

Activating your conda environment
Activating your conda environment is easy, just click the ► button next to your environment, then press Open Terminal. This should open a new terminal with an interface for your conda environment.
From here you can run conda commands to install python packages from the Anaconda repository, or run regular pip commands to install python packages from PyPi inside your environment. All libraries will automatically be installed inside the conda environment.
Editors and IDEs
Visual Studio Code
Visual studio code (VS Code) is a code editor created by Microsoft. It is a general-purpose editor and not designed specifically for any one language. You can extend the editor using extensions; it comes with some great extensions already installed.
Python for VS Code
Extension: Extension-id: ms-python.python

The Python extension from Microsoft is extremely useful because of its range of features. Notably it supports testing and has a testing explorer! It has many other features that you can view on its homepage.
Selecting the interpreter
The Python extensions supports the switching between multiple interpreters. This allows you to use different Python environments for different projects. This is also useful for when you are using venv or conda, which you can find more about in the environments section.
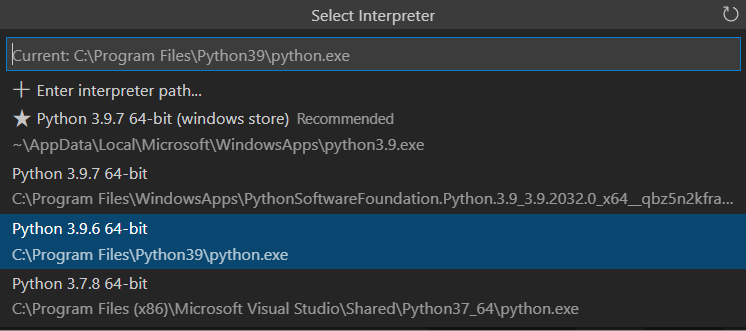
Click on the "Select interpreter" button in the lower left-hand of your window, another window should pop up where you can select the interpreter you want to use.
Other features
The Python plugin also comes with some other features that can help you debug and improve your Python code, here are some of those tools.
Test discovery tool - A tool that generates a tree containing all the pytests and unittests inside a directory. It will give you an easier and more readable interface for pytest.
Debugging tool - This tool will help you debug your code. You can set a breakpoint on a line. The debugging tool then allows you to view all private and global variables at that point in your program.
Linting - Linting looks out for simple mistakes in your code and notifies you when you write code which does not follow best practices according to PEP. Exercism currently focuses on following PEP 8.
Formatting - This tool automatically formats your code to look a certain way. We recommend autopep8 because it adheres to PEP 8. Other formatters are also supported.
Config reference - If you want to configure your Python development on VS Code to behave exactly like you want it, view this reference guide. It explains options for the extensions which can really improve your coding experience.
PyCharm
PyCharm is an Integrated Development Environment built by JetBrains. It is specialized to work for Python and is commonly used among professionals. You can extend it with various paid and unpaid plugins, but out-of-the-box it comes with a load of features already available.
Selecting the interpreter
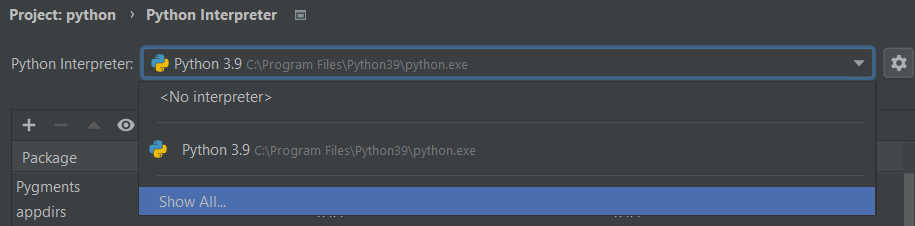
Open your project, then navigate to File >> Settings >> Project: ... >> Python Interpreter. Click on the dropdown menu and select the environment you will be using. If the environment you would like to use is not in the list click on the Show All... button:
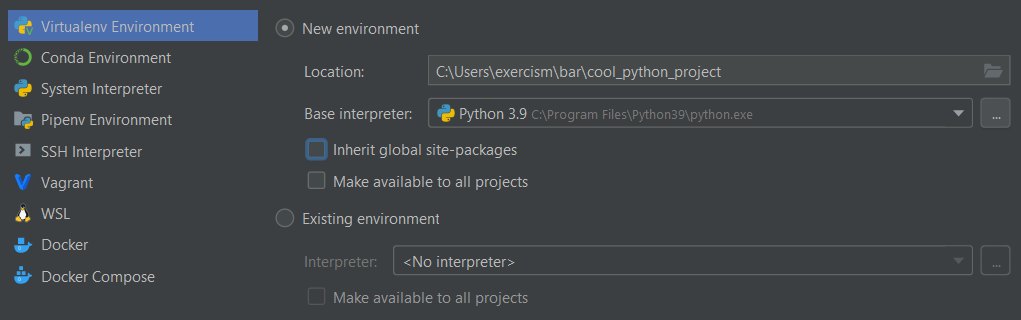
From there click on the + button to add a new interpreter. Select the type of interpreter on the left. We suggest you either run a conda or virtualenv environment, but running the system interpreter works fine, too. Once you selected your interpreter, press the Okay button.
Other features
Below are some other features that we won't cover in this guide, but are really useful for development.
Running Tests - Running tests directly from a GUI in your window is really easy, but don't forget to look at the pytest parameters to set it up to your liking.
Debug Tools - Debugging in PyCharm is a great way to take advantage of its tools.
Spyder IDE
Spyder is a Python IDE tailored for the scientific community. It packs some really good debugging utilities and it has an integrated IPython terminal. Out-of-the-box it does not come with support for unittests and pytests, but there is an official plugin available.
Selecting the interpreter
To change the interpreter, go to tools >> Preferences >> Python interpreter. You can either select the global interpreter defined by Spyder or you can enter the path to your own Python environment.
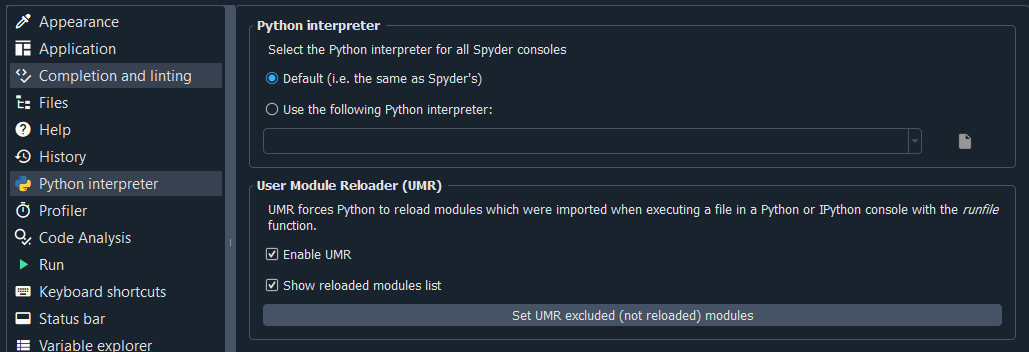
Do not forget to click Apply once you selected your interpreter.
Other features
Spyder Unittest - This plugin gives you a built-in interface for running your tests. This link will bring you to the latest release on GitHub.
Code analyzer - This tool can analyze your code, detecting bad practices, and catching bugs before you run your program. You can also configure it to only show PEP 8 violations.
Debugging - This tool will help you debug your code, it allows you to set a breakpoint on a line. The debugging tool will then let you go through your Python code and quickly notice where it goes wrong.
Variable Explorer - This tool is really useful in combination with the debugger. It allows you to view all the active variables in your code and it even allows you to edit of the values inside those variables.
Sublime text
Sublime text is text editor for coding, made by Sublime HQ Pty Ltd. It is similar to VS Code in many regards. Sublime text is very customizable. It comes with an auto-complete engine and with Python syntax highlighting out-of-the-box.
Notable extensions
Sublime Text comes with a lot of tools already, but some of these tools could make your Python development easier. Make sure you have package control installed, go to Tools >> Install Package Control.... To install packages open your command pallet and type in Package Control: Install Package, here you can enter the name of the packages you'd like to install.
Terminus - A terminal for Sublime. Terminus is fully featured and has support for Windows operating systems. This package is a must-have for running pytest scripts.
SublimeLinter - A linter for sublime. This tool notifies you about Python code that does not follow best practices. We recommend you set it up to use PEP-8.
JupyterLab
Jupyter lab is an in-browser code editor that runs on your machine, combining the ability to write Markdown along side executable code and data. Jupyter supports multiple programming languages via kernels and can display graphs and tables as well as code and text.
Jupyter comes pre-packaged with Anaconda. You can also install it in a virtual environment using pip or conda. Jupyter will use that environment and its Python version. Jupyter is most well-known for its code "notebooks". It is commonly used among data-scientists.
Notable extensions
The built-in tools for Jupyter Lab are sufficient for almost all exercises on Exercism. Most extensions to Jupyter focus more on data-science applications and not general-purpose programming. Explore extensions at your own pleasure.